# pwn 堆 bins 学习。
# 一、bin 链的介绍
bin 是一个由 struct chunk 结构体组成的链表。
前面介绍过,不同的 chunk 根据特点不同分为不同的 chunk,为了将这些 chunk 进行分类的管理,glibc 采用了 bin 链这种方式管理不同的 chunk。
不同的 bin 链是由 arena 管理的。
bin 链中的 chunk 均为 free chunk。
# 二、bin 链分类
- 根据 bin 链成员的大小不同,分为以下几类:
- fast bin 是单链表,其他都是双向链表。
- Fast bin。
- Unsorted bin。
- Small bin。
- Large bin。
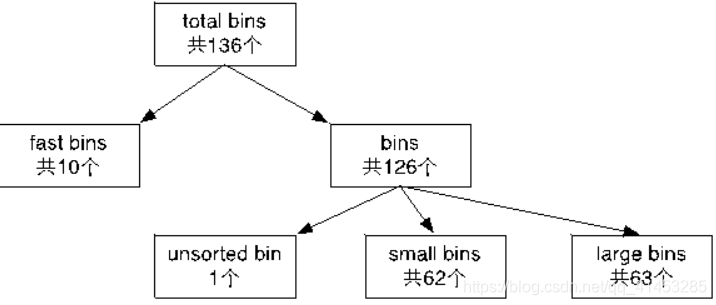
# 三、bin 链的保存(struct malloc_state 结构体)
typedef struct malloc_chunk* mchunkptr; | |
typedef struct malloc_chunk *mfastbinptr; | |
struct malloc_state | |
{ | |
... | |
/*other member*/ | |
... | |
/* Fastbins */ | |
mfastbinptr fastbinsY[NFASTBINS]; | |
/* Normal bins packed as described above */ | |
mchunkptr bins[NBINS * 2 - 2]; | |
... | |
/*other member*/ | |
... | |
}; |
前面说过,不同的 bin 链是由 arena 管理的。因此一个线程中会有很多的 bin 链,这些 bin 链都有 arena 所表示的 struct malloc_state 结构体的以下成员保存:
fastbinY 数组:大小为 10。记录的是 fast bin 链。
bins 数组:大小为 129。记录的是 unsorted bin(1)、small bin(2~63)、large bin 链(64~126)。
# 四、Fast Bin
概念:chunk 的大小在 32 字节 ——128 字节(0x20——0x80)的 chunk 称为 “fast chunk”(大小不是 malloc 时的大小,而是在内存中 struct malloc_chunk 的大小,包含前 2 个成员)。
fast bin 链表的个数为 10 个。
不会对 free chunk 进行合并:鉴于设计 fast bin 的初衷就是进行快速的小内存分配和释放,因此系统将属于 fast bin 的 chunk 的 PREV_INUSE 位总是设置为 1,这样即使当 fast bin 中有某个 chunk 同一个 free chunk 相邻的时候,系统也不会进行自动合并操作,而是保留两者。虽然这样做可能会造成额外的碎片化问题,但瑕不掩瑜。
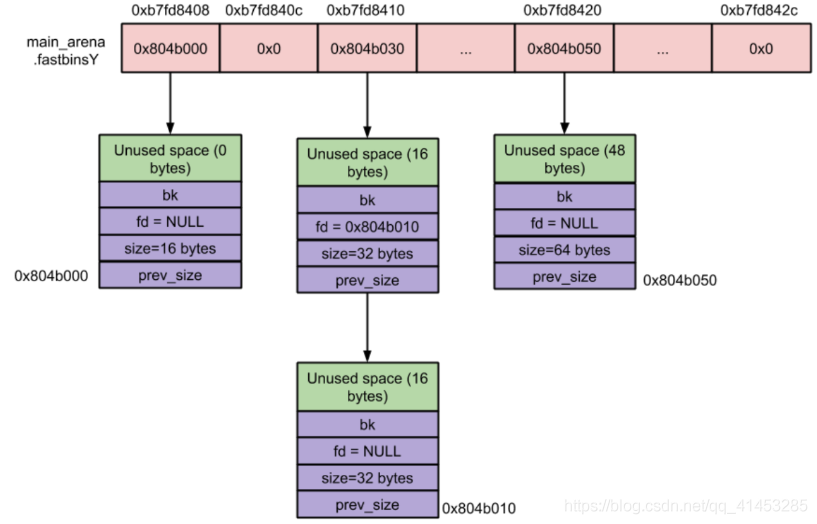
fastbinsY 数组存储 fastbins 的规则
每个 fast bin 链表都是单链表(使用 fd 指针)。因此,fast bin 中无论是添加还是移除 fast chunk,都是对 “链表尾” 进行操作,而不会对某个中间的 fast chunk 进行操作。
单个 fastbin 链表中的 chunk 大小都是相同的,各个 fastbin 链表中的 chunk 大小是不同的。
fastbinY 数组中的每个 bin 链表的排序,是按照链表元素的大小进行排序的。数组的第一个元素的 fast bin 链表中的每个 chunk 的大小是 32 字节的,数组的第二个元素的 fast bin 链表中的每个 chunk 的大小是 48 字节的… 每个元素都比前面的 fast bin 链大 16 字节,以此类推进行排序。
链表索引宏定义:(fastbin_index)
** 功能:** 通过此宏能判断某一个 fastchunk 属于哪一个 fastbin 链表。
** 参数:** 某一个 chunk 的大小。

- malloc 操作与 fastbins 的初始化:
当应用层通过 malloc 函数第一次申请的 chunk 属于 16 字节~80 字节之间时,因为初始化的时候 fast bin 支持的最大内存大小以及所有 fast bin 链表都是空的,所以它也不会交由 fast bin 来处理,而是向下传递交由 small bin 来处理,如果 small bin 也为空的话就交给 unsorted bin 处理。- 那么,fast bin 如何进行初始化哪?
当我们第一次调用 malloc (fast bin) 的时候,系统执行_int_malloc 函数,该函数首先会发现当前 fast bin 为空,就转交给 small bin 处理,进而又发现 small bin 也为空,就调用 malloc_consolidate 函数对 malloc_state 结构体进行初始化。malloc_consolidate 函数主要完成以下几个功能:
a 首先判断当前 malloc_state 结构体中的 fast bin 是否为空,如果为空就说明整个 malloc_state 都没有完成初始化,需要对 malloc_state 进行初始化。
b malloc_state 的初始化操作由函数 malloc_init_state (av) 完成,该函数先初始化除 fast bin 之外的所有的 bins,再初始化 fast bins。
那么当再次执行 malloc (fast chunk) 函数的时候,此时 fast bin 相关数据不为空了,就可以使用 fast bin。
- free 操作
这个操作很简单,主要分为两步:先通过 chunksize 函数根据传入的地址指针获取该指针对应的 chunk 的大小;然后根据这个 chunk 大小获取该 chunk 所属的 fast bin,然后再将此 chunk 添加到该 fast bin 的链尾即可。整个操作都是在_int_free 函数中完成。
# 五、Unsorted Bin
何时使用:当释放较小或较大的 chunk 的时候,如果系统没有将它们添加到对应的 bins 中,系统就将这些 chunk 添加到 unsorted bin 中。
目的:这主要是为了让 “glibc malloc 机制” 能够有第二次机会重新利用最近释放的 chunk (第一次机会就是 fast bin 机制)。利用 unsorted bin,可以加快内存的分配和释放操作,因为整个操作都不再需要花费额外的时间去查找合适的 bin 了。
Unsorted bin 的特性如下:
unsorted bin 的个数: 1 个。
unsorted bin 是一个由 free chunks 组成的循环双链表。
在 unsorted bin 中,对 chunk 的大小并没有限制,任何大小的 chunk 都可以归属到 unsorted bin 中。
unsortedbin 采用的遍历顺序是 FIFO。
# 六、Small Bin
概念:小于 1024 字节(0x400)的 chunk 称之为 small chunk,small bin 就是用于管理 small chunk 的。
small bin 链表的个数为 62 个。
就内存的分配和释放速度而言,small bin 比 larger bin 快,但比 fast bin 慢。
合并操作:相邻的 free chunk 需要进行合并操作,即合并成一个大的 free chunk。具体操作见下文 free (small chunk) 介绍。
Small Bin 链表的特性
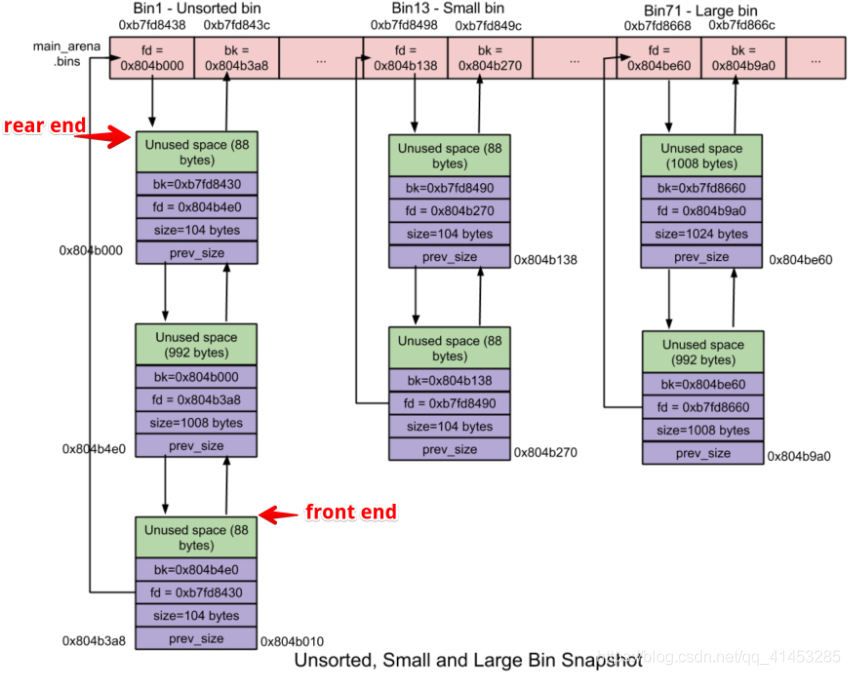
每个 smallbin 也是一个由对应 free chunk 组成的循环双链表。
small bin 采用 FIFO (先入先出) 算法:内存释放操作就将新释放的 chunk 添加到链表的 front end (前端),分配操作就从链表的 rear end (尾端) 中获取 chunk。
单个 smallbin 链表中的 chunk 大小都是相同的,各个 smallbin 链表中的 chunk 大小是不同的,跟 fastbinsY 数组存储 fastbin 链的原理是相同的。
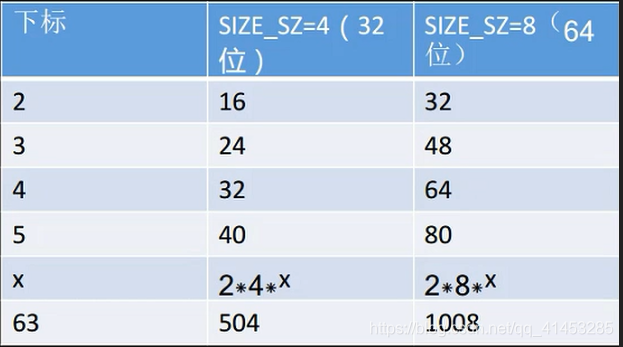
bins 数组存储 small bin 链时:第一个 small bin 链中 chunk 的大小为 32 字节,后续每个 small bin 中 chunk 的大小依次增加两个机器字长(32 位相差 8 字节,64 位相差 16 字节)… 以此类推,跟 fastbinsY 数组存储 fastbin 链的原理是相同的(用下图表示)。bin 链存储的大小与数组下标的关系:chun_size=2SIZE_SZindex。
malloc 操作与 small bin 的初始化
- 类似于 fast bins,最初所有的 small bin 都是空的,因此在对这些 small bin 完成初始化之前,即使用户请求的内存大小属于 small chunk 也不会交由 small bin 进行处理,而是交由 unsorted bin 处理。
- 如果 unsorted bin 也不能处理的话,glibc malloc 就依次遍历后续的所有 bins,找出第一个满足要求的 bin,如果所有的 bin 都不满足的话,就转而使用 top chunk,如果 top chunk 大小不够,那么就扩充 top chunk,这样就一定能满足需求了。
- 注意遍历后续 bins 以及之后的操作同样被 large bin 所使用,因此,将这部分内容放到 large bin 的 malloc 操作中加以介绍。
- 那么 glibc malloc 是如何初始化这些 bins 的呢?因为这些 bin 属于 malloc_state 结构体,所以在初始化 malloc_state 的时候就会对这些 bin 进行初始化,代码如下:
- 将 bins 数组中的第一个成员索引值设置为了 1,而不是我们常用的 0 (在 bin_at 宏中,自动将 i 进行了减 1 处理)。
- 从上面代码可以看出在初始化的时候 glibc malloc 将所有 bin 的指针都指向了自己 —— 这就代表这些 bin 都是空的。
{mbinptr bin;/* Establish circular links for normal bins */{}}
- 过后,当再次调用 malloc (small chunk) 的时候,如果该 chunk size 对应的 small bin 不为空,就从该 small bin 链表中取得 small chunk 给 malloc 使用。
free 操作
- small 的 free 比较特殊。当释放 small chunk 的时候,先检查该 chunk 相邻的 chunk 是否为 free,如果是的话就进行合并操作:将这些 chunks 合并成新的 chunk,然后将它们从 small bin 中移除,最后将新的 chunk 添加到 unsorted bin 中,之后 unsorted bin 进行整理再添加到对应的 bin 链上(后面会有图介绍)。
# 七、Large Bin
-
概念:大于等于 1024 字节(0x400)的 chunk 称之为 large chunk,large bin 就是用于管理这些 largechunk 的。
-
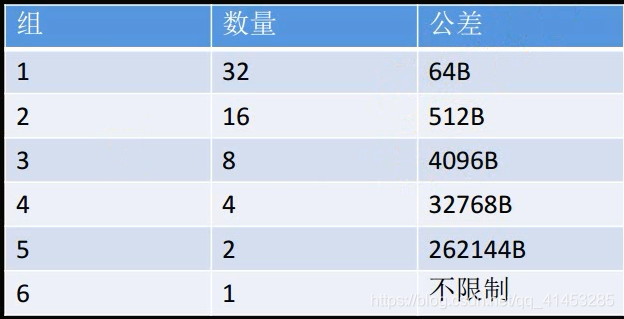
large bin 链表的个数为 63 个,被分为 6 组。
-
largechunk 使用 fd_nextsize、bk_nextsize 连接起来的。
-
合并操作:类似于 small bin。
Large Bin 链表的特性
- 同一个 largebin 中每个 chunk 的大小可以不一样,这些 chunk 根据一定的范围存储在一个 larbin 链表中。
- large chunk 可以添加、删除在 large bin 的任何一个位置。
- 在这 63 个 largebins 中:第一组的 32 个 largebin 链依次以 64 字节步长为间隔,即第一个 largebin 链中 chunksize 为 1024-1087 字节,第二个 large bin 中 chunk size 为 1088~1151 字节。第二组的 16 个 largebin 链依次以 512 字节步长为间隔;第三组的 8 个 largebin 链以步长 4096 为间隔;第四组的 4 个 largebin 链以 32768 字节为间隔;第五组的 2 个 largebin 链以 262144 字节为间隔;最后一组的 largebin 链中的 chunk 大小无限制。
- 在同一个 largebin 中:每个 chunk 的大小不一定相同,因此为了加快内存分配和释放的速度,就将同一个 largebin 中的所有 chunk 按照 chunksize 进行从大到小的排列:最大的 chunk 放在一个链表的 front end,最小的 chunk 放在 rear end;相同大小的 chunk 按照最近使用顺序排序。
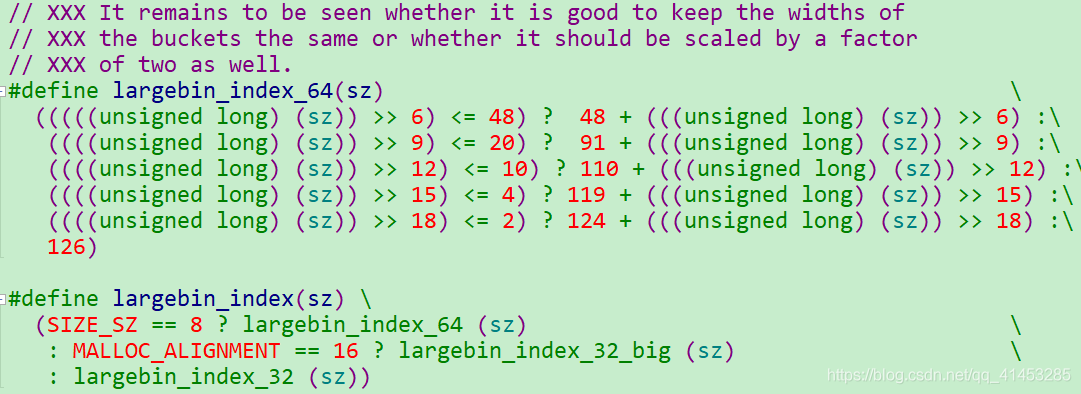
# 链表索引宏定义:(largebin_index)
参数为链表能存储的 chunk 大小,宏定义中有简介调用其他宏定义。
例如:第一个 largebin 的起始大小为 1024,那么 1024>>6=16,所以其在 bins 数组中的下标为 48+16=64。
malloc 操作与 large bin 的初始化
- 初始化完成之前的操作类似于 small bin。
- 下面讨论 large bins 初始化完成之后的操作:
- 首先确定用户请求的大小属于哪一个 large bin,然后判断该 large bin 中最大的 chunk 的 size 是否大于用户请求的 size (只需要对比链表中 front end 的 size 即可)。如果大于,就从 rear end 开始遍历该 large bin,找到第一个 size 相等或接近的 chunk,分配给用户。如果该 chunk 大于用户请求的 size 的话,就将该 chunk 拆分为两个 chunk:前者返回给用户,且 size 等同于用户请求的 size;剩余的部分做为一个新的 chunk 添加到 unsorted bin 中。
- 如果该 large bin 中最大的 chunk 的 size 小于用户请求的 size 的话,那么就依次查看后续的 large bin 中是否有满足需求的 chunk,不过需要注意的是鉴于 bin 的个数较多 (不同 bin 中的 chunk 极有可能在不同的内存页中),如果按照上一段中介绍的方法进行遍历的话 (即遍历每个 bin 中的 chunk),就可能会发生多次内存页中断操作,进而严重影响检索速度,所以 glibc malloc 设计了 Binmap 结构体来帮助提高 bin-by-bin 检索的速度。Binmap 记录了各个 bin 中是否为空,通过 bitmap 可以避免检索一些空的 bin。如果通过 binmap 找到了下一个非空的 large bin 的话,就按照上一段中的方法分配 chunk,否则就使用 top chunk 来分配合适的内存。
# free 操作
类似于 small chunk。
# 八、tcache
cache 是 glibc 2.26 (ubuntu 17.10) 之后引入的一种技术(see commit),目的是提升堆管理的性能。但提升性能的同时舍弃了很多安全检查,也因此有了很多新的利用方式。
主要参考了 glibc 源码,angelboy 的 slide 以及 tukan.farm,链接都放在最后了。
相关结构体 
tcache 引入了两个新的结构体, tcache_entry 和 tcache_perthread_struct 。
这其实和 fastbin 很像,但又不一样。
tcache_entry
source code
/* We overlay this structure on the user-data portion of a chunk when | |
the chunk is stored in the per-thread cache. */ | |
typedef struct tcache_entry | |
{ | |
struct tcache_entry *next; | |
} tcache_entry; |
tcache_entry 用于链接空闲的 chunk 结构体,其中的 next 指针指向下一个大小相同的 chunk。
需要注意的是这里的 next 指向 chunk 的 user data,而 fastbin 的 fd 指向 chunk 开头的地址。
而且,tcache_entry 会复用空闲 chunk 的 user data 部分。
tcache_perthread_struct
source code
/* There is one of these for each thread, which contains the | |
per-thread cache (hence "tcache_perthread_struct"). Keeping | |
overall size low is mildly important. Note that COUNTS and ENTRIES | |
are redundant (we could have just counted the linked list each | |
time), this is for performance reasons. */ | |
typedef struct tcache_perthread_struct | |
{ | |
char counts[TCACHE_MAX_BINS]; | |
tcache_entry *entries[TCACHE_MAX_BINS]; | |
} tcache_perthread_struct; | |
# define TCACHE_MAX_BINS 64 | |
static __thread tcache_perthread_struct *tcache = NULL; |
每个 thread 都会维护一个 tcache_perthread_struct ,它是整个 tcache 的管理结构,一共有 TCACHE_MAX_BINS 个计数器和 TCACHE_MAX_BINS 项 tcache_entry,其中
tcache_entry用单向链表的方式链接了相同大小的处于空闲状态(free 后)的 chunk,这一点上和 fastbin 很像。counts记录了tcache_entry链上空闲 chunk 的数目,每条链上最多可以有 7 个 chunk。
用图表示大概是:
基本工作方式 
- 第一次 malloc 时,会先 malloc 一块内存用来存放
tcache_perthread_struct。 - free 内存,且 size 小于 small bin size 时
- tcache 之前会放到 fastbin 或者 unsorted bin 中
- tcache 后:
- 先放到对应的 tcache 中,直到 tcache 被填满(默认是 7 个)
- tcache 被填满之后,再次 free 的内存和之前一样被放到 fastbin 或者 unsorted bin 中
- tcache 中的 chunk 不会合并(不取消 inuse bit)
- malloc 内存,且 size 在 tcache 范围内
- 先从 tcache 取 chunk,直到 tcache 为空
- tcache 为空后,从 bin 中找
- tcache 为空时,如果
fastbin/smallbin/unsorted bin中有 size 符合的 chunk,会先把fastbin/smallbin/unsorted bin中的 chunk 放到 tcache 中,直到填满。之后再从 tcache 中取;因此 chunk 在 bin 中和 tcache 中的顺序会反过来
源码分析 
接下来从源码的角度分析一下 tcache。
libc_malloc
第一次 malloc 时,会进入到 MAYBE_INIT_TCACHE ()
source code
void * | |
__libc_malloc (size_t bytes) | |
{ | |
...... | |
...... | |
#if USE_TCACHE | |
/* int_free also calls request2size, be careful to not pad twice. */ | |
size_t tbytes; | |
// 根据 malloc 传入的参数计算 chunk 实际大小,并计算 tcache 对应的下标 | |
checked_request2size (bytes, tbytes); | |
size_t tc_idx = csize2tidx (tbytes); | |
// 初始化 tcache | |
MAYBE_INIT_TCACHE (); | |
DIAG_PUSH_NEEDS_COMMENT; | |
if (tc_idx < mp_.tcache_bins // 根据 size 得到的 idx 在合法的范围内 | |
/*&& tc_idx < TCACHE_MAX_BINS*/ /* to appease gcc */ | |
&& tcache | |
&& tcache->entries[tc_idx] != NULL) //tcache->entries [tc_idx] 有 chunk | |
{ | |
return tcache_get (tc_idx); | |
} | |
DIAG_POP_NEEDS_COMMENT; | |
#endif | |
...... | |
...... | |
} |
tcache_init()
其中 MAYBE_INIT_TCACHE () 在 tcache 为空(即第一次 malloc)时调用了 tcache_init() ,直接查看 tcache_init()
source code
tcache_init(void) | |
{ | |
mstate ar_ptr; | |
void *victim = 0; | |
const size_t bytes = sizeof (tcache_perthread_struct); | |
if (tcache_shutting_down) | |
return; | |
arena_get (ar_ptr, bytes); // 找到可用的 arena | |
victim = _int_malloc (ar_ptr, bytes); // 申请一个 sizeof (tcache_perthread_struct) 大小的 chunk | |
if (!victim && ar_ptr != NULL) | |
{ | |
ar_ptr = arena_get_retry (ar_ptr, bytes); | |
victim = _int_malloc (ar_ptr, bytes); | |
} | |
if (ar_ptr != NULL) | |
__libc_lock_unlock (ar_ptr->mutex); | |
/* In a low memory situation, we may not be able to allocate memory | |
- in which case, we just keep trying later. However, we | |
typically do this very early, so either there is sufficient | |
memory, or there isn't enough memory to do non-trivial | |
allocations anyway. */ | |
if (victim) // 初始化 tcache | |
{ | |
tcache = (tcache_perthread_struct *) victim; | |
memset (tcache, 0, sizeof (tcache_perthread_struct)); | |
} | |
} |
tcache_init() 成功返回后, tcache_perthread_struct 就被成功建立了。
申请内存 
接下来将进入申请内存的步骤
// 从 tcache list 中获取内存 | |
if (tc_idx < mp_.tcache_bins // 由 size 计算的 idx 在合法范围内 | |
/*&& tc_idx < TCACHE_MAX_BINS*/ /* to appease gcc */ | |
&& tcache | |
&& tcache->entries[tc_idx] != NULL) // 该条 tcache 链不为空 | |
{ | |
return tcache_get (tc_idx); | |
} | |
DIAG_POP_NEEDS_COMMENT; | |
#endif | |
// 进入与无 tcache 时类似的流程 | |
if (SINGLE_THREAD_P) | |
{ | |
victim = _int_malloc (&main_arena, bytes); | |
assert (!victim || chunk_is_mmapped (mem2chunk (victim)) || | |
&main_arena == arena_for_chunk (mem2chunk (victim))); | |
return victim; | |
} |
在 tcache->entries 不为空时,将进入 tcache_get() 的流程获取 chunk,否则与 tcache 机制前的流程类似,这里主要分析第一种 tcache_get() 。这里也可以看出 tcache 的优先级很高,比 fastbin 还要高( fastbin 的申请在没进入 tcache 的流程中)。
tcache_get()
看一下 tcache_get()
source code
/* Caller must ensure that we know tc_idx is valid and there's | |
available chunks to remove. */ | |
static __always_inline void * | |
tcache_get (size_t tc_idx) | |
{ | |
tcache_entry *e = tcache->entries[tc_idx]; | |
assert (tc_idx < TCACHE_MAX_BINS); | |
assert (tcache->entries[tc_idx] > 0); | |
tcache->entries[tc_idx] = e->next; | |
--(tcache->counts[tc_idx]); // 获得一个 chunk,counts 减一 | |
return (void *) e; | |
} |
tcache_get() 就是获得 chunk 的过程了。可以看出这个过程还是很简单的,从 tcache->entries[tc_idx] 中获得第一个 chunk, tcache->counts 减一,几乎没有任何保护。
libc_free()
看完申请,再看看有 tcache 时的释放
source code
void | |
__libc_free (void *mem) | |
{ | |
...... | |
...... | |
MAYBE_INIT_TCACHE (); | |
ar_ptr = arena_for_chunk (p); | |
_int_free (ar_ptr, p, 0); | |
} |
__libc_free() 没有太多变化, MAYBE_INIT_TCACHE () 在 tcache 不为空失去了作用。
int_free()
跟进 _int_free()
source code
static void | |
_int_free (mstate av, mchunkptr p, int have_lock) | |
{ | |
...... | |
...... | |
#if USE_TCACHE | |
{ | |
size_t tc_idx = csize2tidx (size); | |
if (tcache | |
&& tc_idx < mp_.tcache_bins // 64 | |
&& tcache->counts[tc_idx] < mp_.tcache_count) // 7 | |
{ | |
tcache_put (p, tc_idx); | |
return; | |
} | |
} | |
#endif | |
...... | |
...... |
判断 tc_idx 合法, tcache->counts[tc_idx] 在 7 个以内时,就进入 tcache_put() ,传递的两个参数是要释放的 chunk 和该 chunk 对应的 size 在 tcache 中的下标。
tcache_put()
source code
/* Caller must ensure that we know tc_idx is valid and there's room | |
for more chunks. */ | |
static __always_inline void | |
tcache_put (mchunkptr chunk, size_t tc_idx) | |
{ | |
tcache_entry *e = (tcache_entry *) chunk2mem (chunk); | |
assert (tc_idx < TCACHE_MAX_BINS); | |
e->next = tcache->entries[tc_idx]; | |
tcache->entries[tc_idx] = e; | |
++(tcache->counts[tc_idx]); | |
} |
tcache_puts() 完成了把释放的 chunk 插入到 tcache->entries[tc_idx] 链表头部的操作,也几乎没有任何保护。并且 没有把 p 位置零。
版权声明:本文为 CSDN 博主「董哥的黑板报」的原创文章,遵循 CC 4.0 BY-SA 版权协议,转载请附上原文出处链接及本声明。
原文链接:https://blog.csdn.net/qq_41453285/article/details/96865321ctf-wiki:tcache - CTF Wiki (ctf-wiki.org)